Posted 2024/10/23
A Custom, Maximal, Lisp-Style Keyboard
I’ve used an Ergodox EZ keyboard for a long time and found it pretty suitable, but I’ve always been slightly frustrated with the limited number of keys available. Like a lot of nerds, I get all hot and bothered by the likes of the Space Cadet keyboard, and as an Emacs user it would be nice to actually have a real ‘Super’ key. Most premade keyboards are either standard your standard 104-key thing with a Windows key and a numpad (useless), or a super-minimalist 40% thing where you have to hit two modifier keys just to type a number… so I ended up just building my own.

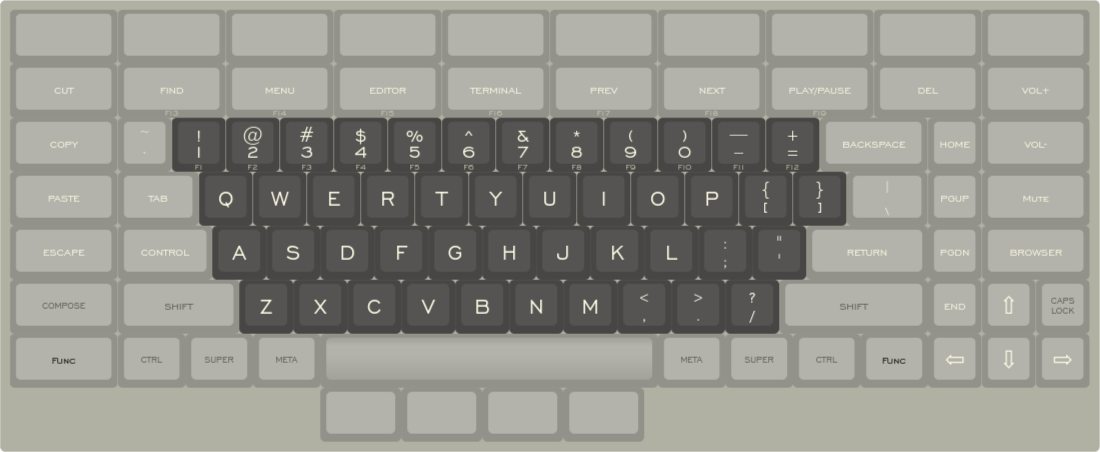
Here’s the layout, shamelessly adapted from the Symbolics keyboard:

You can download the JSON for it here. Note that I didn’t spend a lot of effort making all the colors on the modifier keys match perfectly, since the keyboard layout site is really only to position the keyswitches.
My design logic was as follows:
- Put Control on the home row, the way I like it.
- Also put Meta (Alt), Super, and Control in the usual spots.
- Have Escape near at hand (I do use vi a lot too).
- Have a real arrow key cluster.
- Keep Caps Lock because sometimes you want it, but banish it far to the edge.
- Have some media keys handy.
- Expose some of the other keys you’d find on the old Sun keyboards, like Find and Menu.
- Toss in a couple others (like Editor, Terminal, and Browser) that I can bind in my window manager as desired.
- Have a row of blank keys at the top and under the spacebar for binding as I prefer.
Once I designed the keyboard, I used http://builder.swillkb.com/ to generate CAD files for the plates. I selected MX switch cutouts with costar stabilizers, as my understanding was this would be the safest option during laser cutting. I selected a “sandwich” plate, but only planned to actually manufacture the base and the switch layers, using offsets to hold them an appropriate distance apart. I selected 8 mount holes with a 3.2mm hole width (for use with M3 screws) and an 8mm edge width. I turned on Edge Padding with 30mm on the top edge and 10mm on the other edges. I added plate corners too, but unfortunately I didn’t write down what radius I selected. I also used the “Custom Polygons” setting to add another 3.2mm hole right in the middle, at the intersection of the H, U, and J keys, so I could have a center standoff for strength.
With the DXF files generated above, I ordered my plates from ponoko, selecting 304 Stainless at 1.5mm thickness. This cost $145.
I selected Kailh Box White switches and ordered 108 of them from Amazon at a cost of $36. I also ordered a cheap keycap set just to test with once I got the keyboard assembled.
Assembly was straightforward: I snapped the keys into the plate, then soldered them together following the basic technique desrcribed in this post. Be warned that soldering 102 switches and diodes together by hand will be extremely time-consuming!
I chose to use a Raspberry Pi Pico (RP2040) microcontroller running QMK to drive the keyboard. This wasn’t too challenging, but entering all the correct matrix positions for the various keys was nearly as tedious as soldering the switches! I’ll put the keyboard definition files on Github eventually.
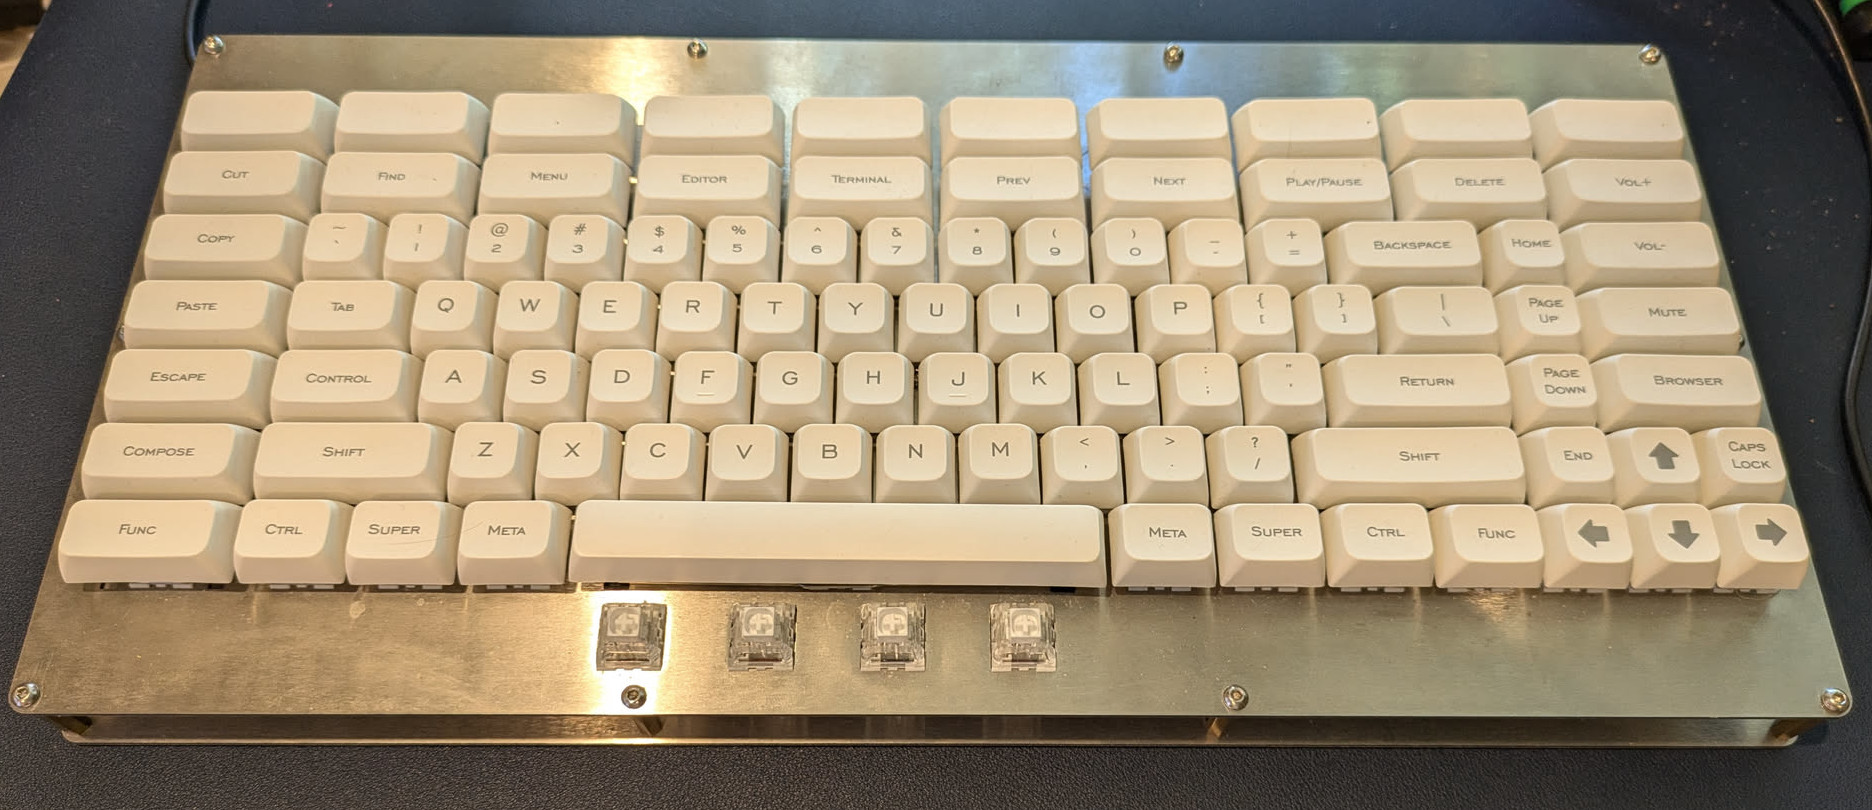
Once the keyboard was programmed, I put on the cheap keycap set to test with. When I was satisfied, I then used FK Keycaps’ custom cap service to get the keycaps. You can only get XDA profile, which isn’t what I wanted originally but I eventually came to appreciate the way I can theoretically mix-and-match rows at will. My order came out to $111, including shipping from Malaysia. As you can tell from the picture, though, I screwed up and used the wrong size keycaps for the row under the spacebar – I had originally specified it as 2U keys, but then changed to 1.5U just before I cut the plates… but after I had started laying out the keycaps on FK’s site. I’ll make another order eventually, but for now I’m playing around with what I want those keys to be anyway (I’ve currently got the outer two bound to XF86Back/XF86Forward and set StumpWM to cycle through hidden windows when I hit them).
The verdict? It was a hell of a lot of work, but I’m pleased with the results. It looks good and works well, and with all these spare keys I’ve been experimenting with various shortcuts I can bind in. I do intend to eventually model and 3d-print some form of case, but for now it’s just fine “bare”.
Component costs
- Plates: $145
- Switches: $36
- Controller: $7
- Keycaps: $111
- Hardware and wire: $10 (est)
Total: $309